

When it comes to strength training, more isn’t always better. If you’re healthy and ready to start, aiming for 2-3 days of strength training per week is a great starting point (1). Before picking up weights or using your body as resistance, the first step is to warm up properly to help prevent injury. A good warm-up can be as simple as 5-10 minutes of light activity and dynamic stretching before your workout.
Let’s Warm Up
Warming up and stretching are essential components of any strength training routine. Stretching cold muscles can increase the risk of injury, as muscles that haven’t been properly warmed up are more prone to strains. To prepare your body and increase blood flow, opt for a dynamic warm-up instead of diving straight into deep stretches. A proper warm-up not only helps prevent injury but also improves overall performance.
Dynamic Stretching: A Key Component of Your Warm-Up
Dynamic stretching involves active, controlled movements that take your joints through their full range of motion. Performed as part of a pre-workout warm-up, dynamic stretching helps increase body temperature and blood flow, preparing your muscles for the physical demands of exercise. Research shows that dynamic stretching activates muscles and improves flexibility without the risks associated with static stretching before a workout. Movements such as leg swings, arm circles, and walking lunges help engage key muscle groups, making them more responsive and ready for physical activity (2, 3).
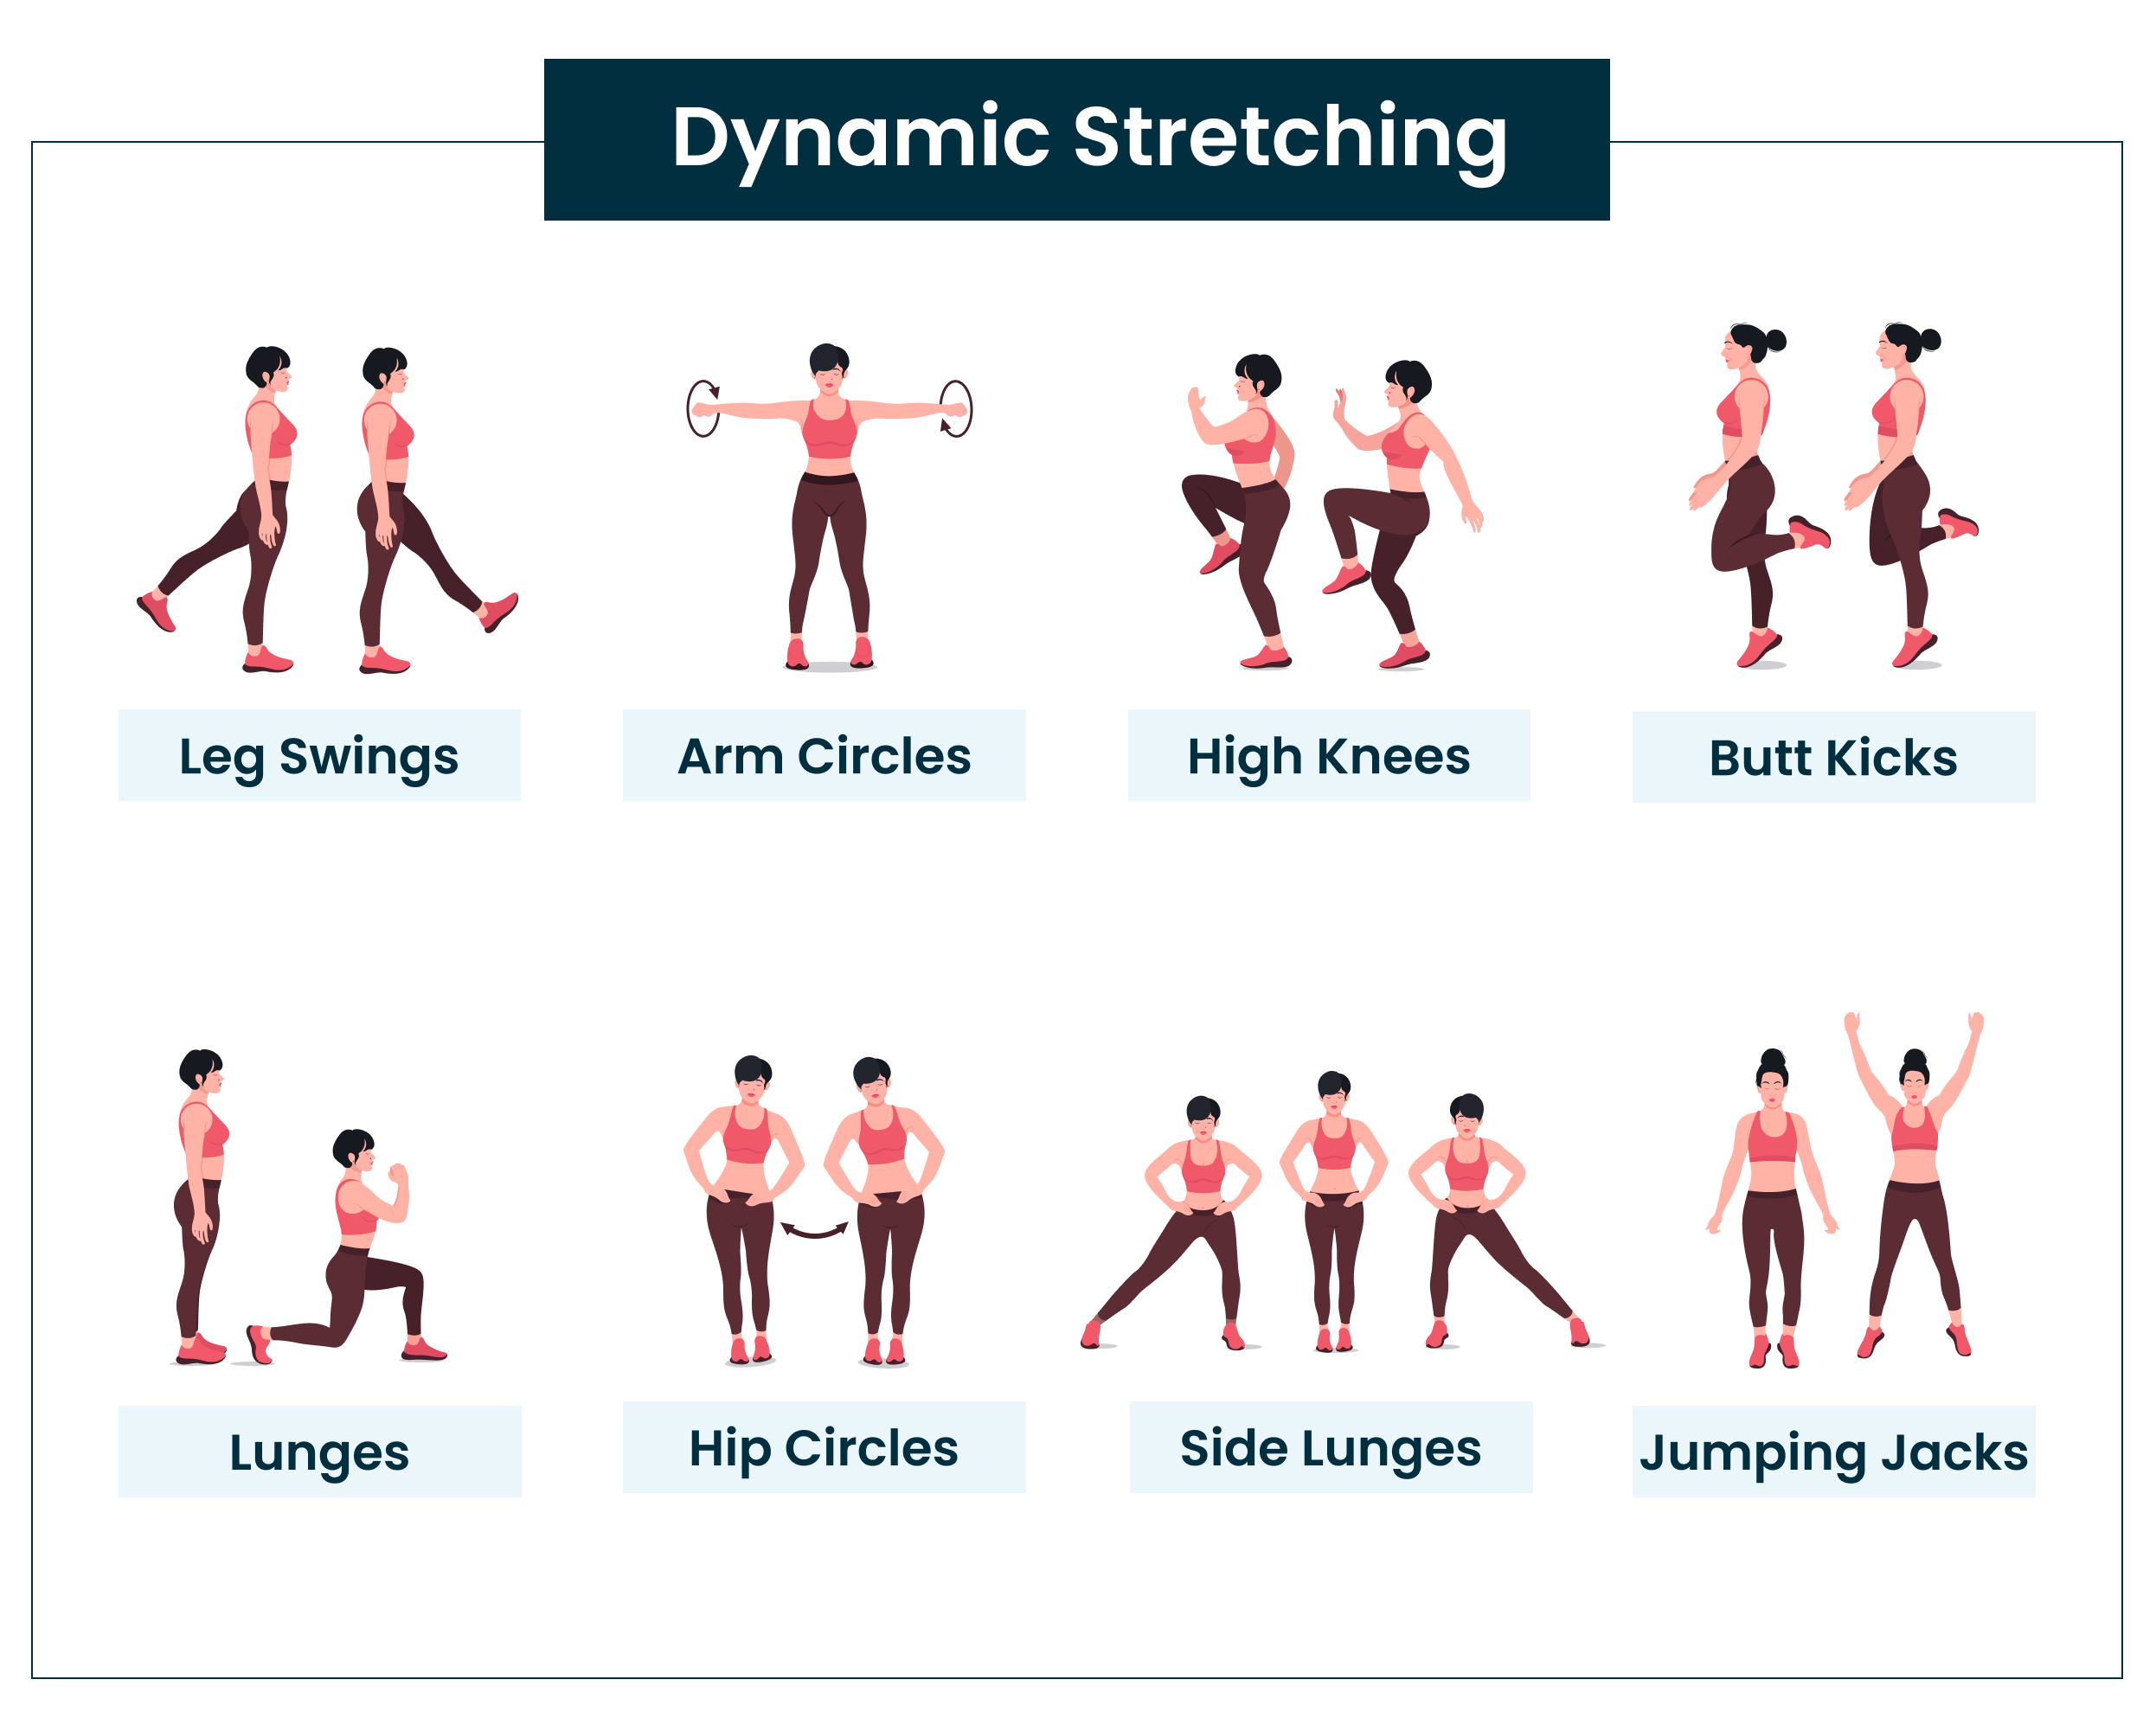
Dynamic Movements for a Pre-Workout Warm-Up
Dynamic stretching involves movements that warm up your body, improve joint mobility, and increase blood flow.
- Leg Swings – Swing your legs forward and backward or side to side to warm up your hips, hamstrings, and glutes.
- Arm Circles – Perform small to large circles to warm up your shoulders.
- High Knees – March or run in place, lifting your knees high to engage your hip flexors and core.
- Butt Kicks – Jog in place, kicking your heels toward your glutes to activate your hamstrings.
- Lunges with a Twist – Step forward into a lunge and twist your torso to activate your core and warm up your legs.
- Hip Circles – Place your hands on your hips or extend your arms, then rotate your hips in circular motions to improve pelvic mobility.
- Side Lunges – Step out to the side, shifting your weight from one leg to the other to stretch your inner thighs and engage your legs.
- Jumping Jacks – Perform this full-body movement to elevate your heart rate and engage multiple muscle groups.
- Toy Soldiers – Keep your legs straight and alternate kicking each leg toward the opposite hand to stretch your hip flexors and hamstrings.
Incorporating these movements into your warm-up routine can help enhance performance and reduce the risk of injury.
Static Stretching
Static Stretching: A Post-Workout Essential
Static stretching involves holding a stretch for 10–30 seconds and is most beneficial after exercise or following a dynamic warm-up. Research shows that static stretching post-exercise helps lengthen muscles, improve flexibility, and enhance recovery. It reduces muscle tension, improves range of motion, and minimizes the risk of post-workout stiffness. Studies also suggest that static stretching can restore muscle length and prevent tightness after physical activity (2, 3).
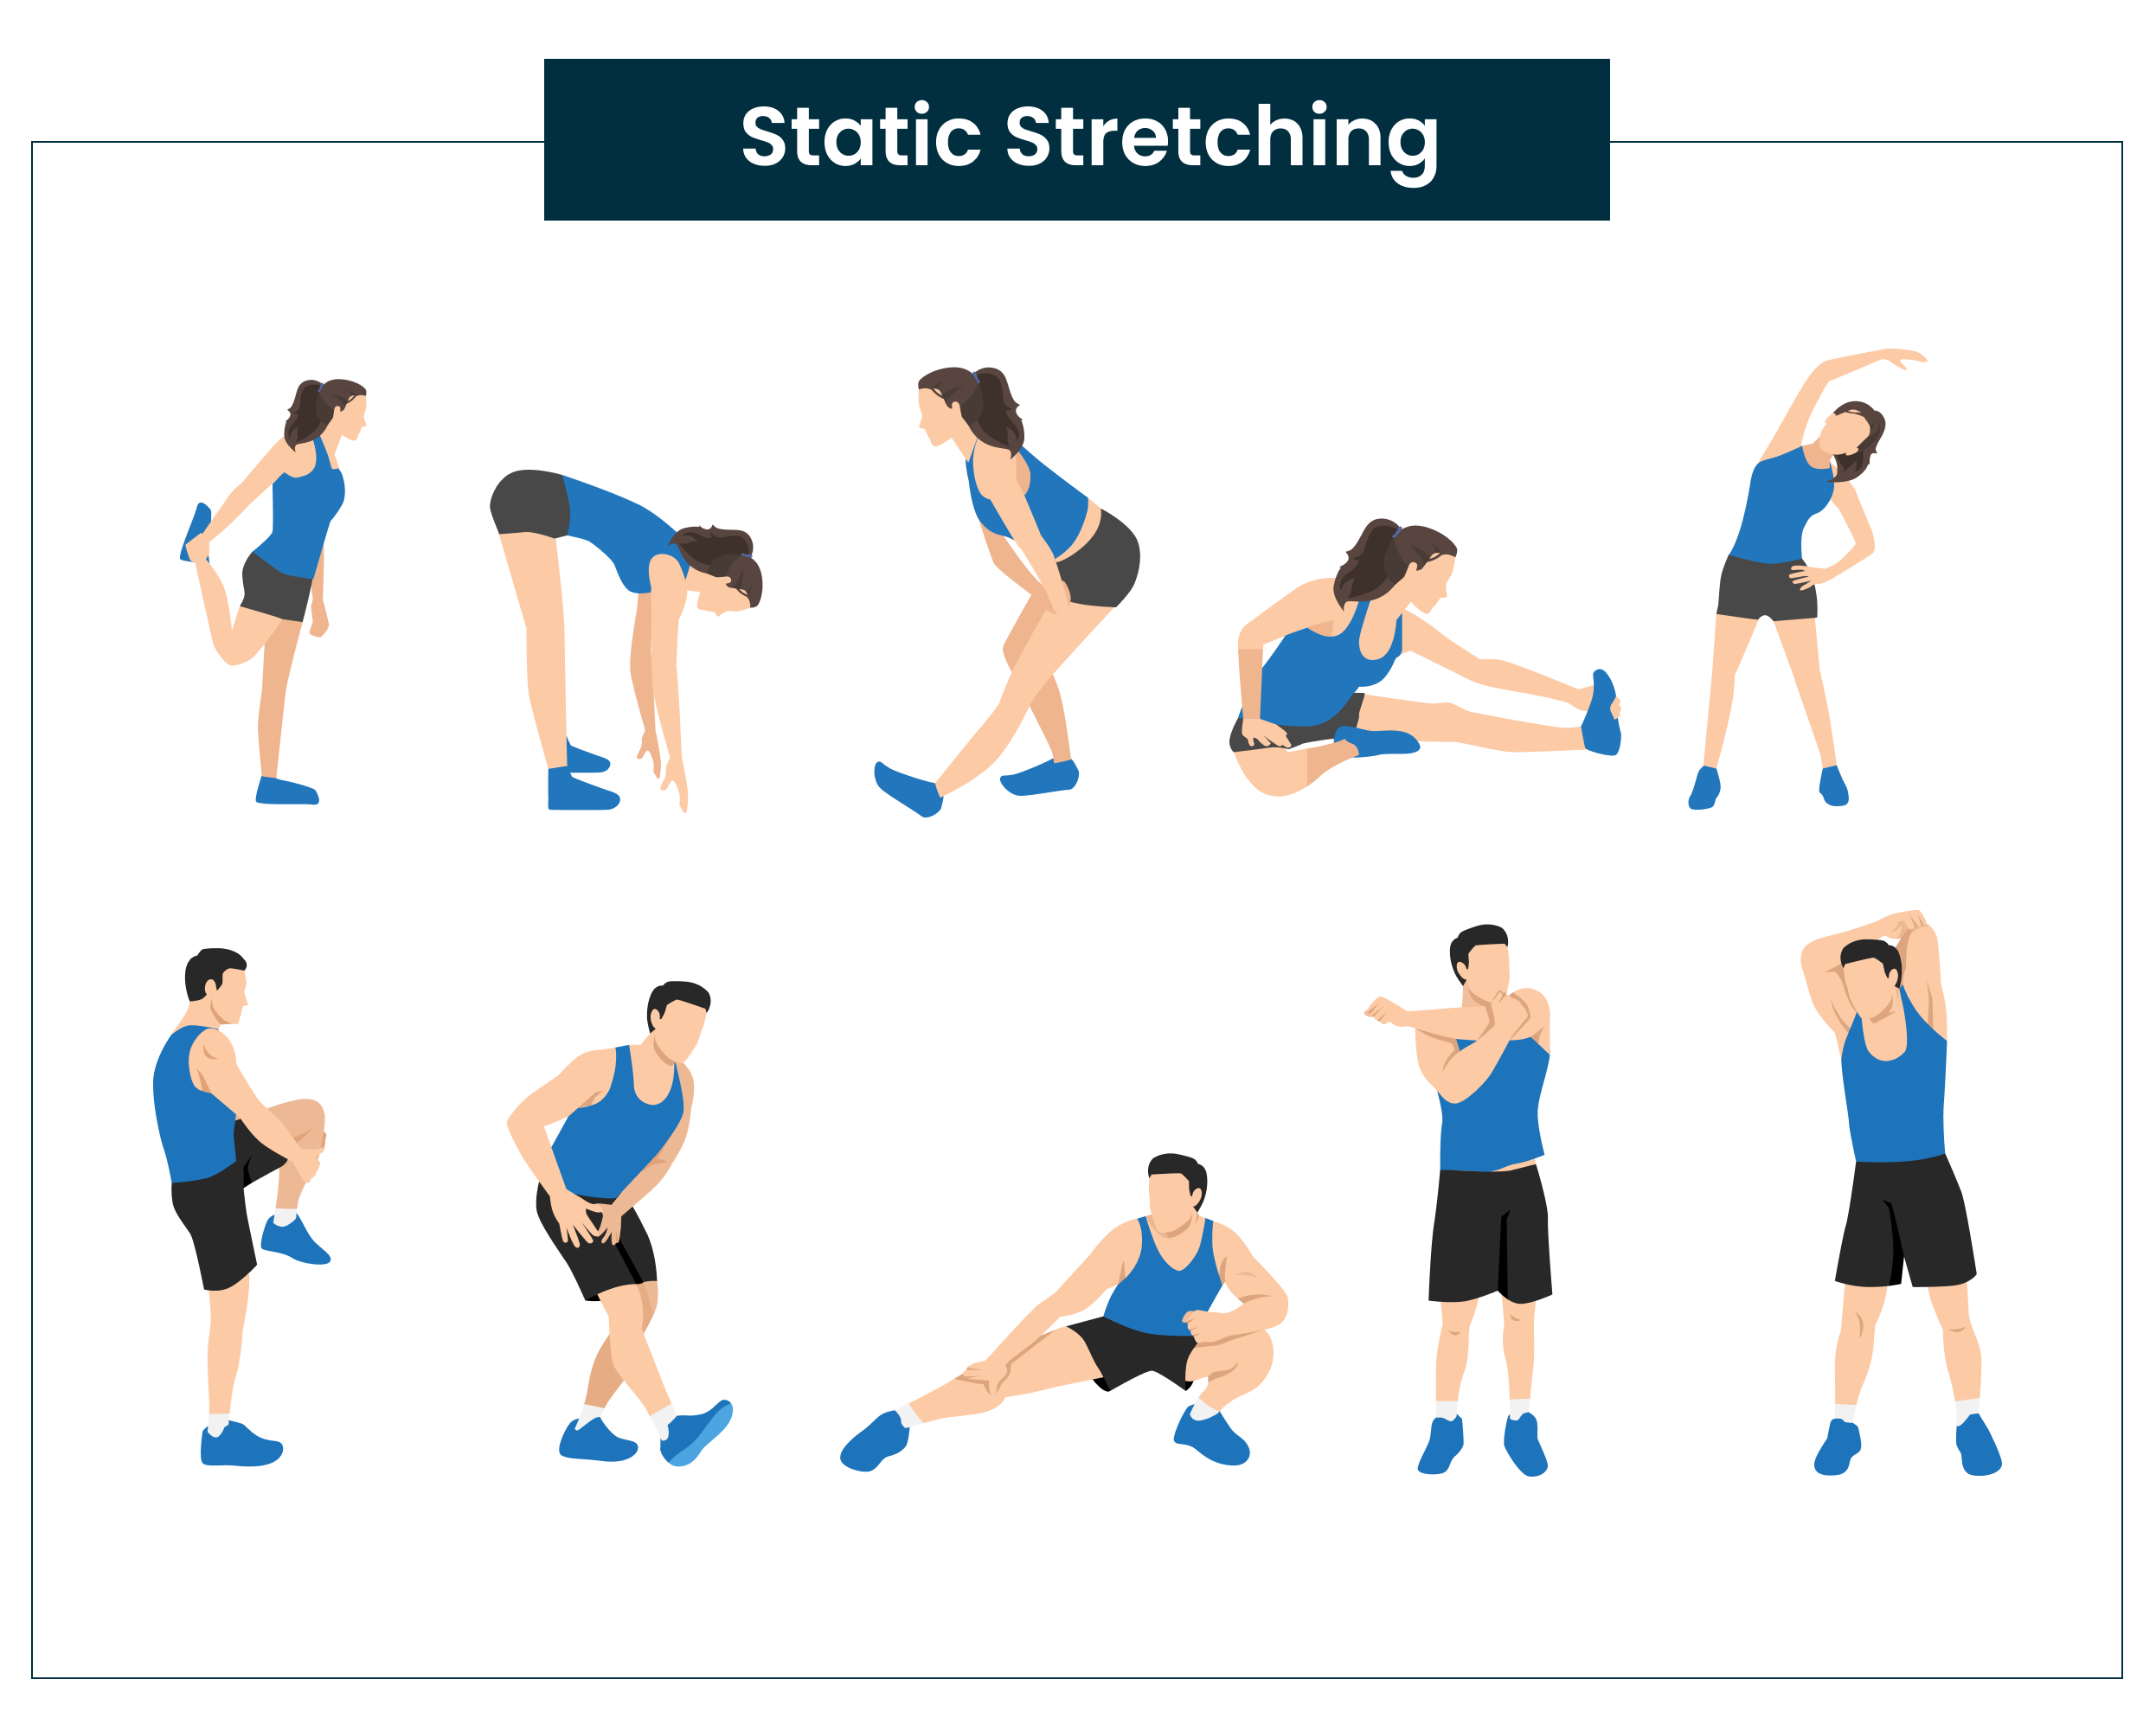
Static Movements for Post-Workout Stretching
Static stretching focuses on holding a stretch to lengthen muscles and enhance flexibility after your body is warmed up.
- Hamstring Stretch – Sit on the floor with one leg extended and the other bent. Reach for the toes of your extended leg to stretch your hamstring.
- Quadriceps Stretch – Stand on one leg and pull your opposite ankle toward your glutes, holding it with your hand to stretch your thigh.
- Cross-Body Arm Stretch – Extend one arm across your chest and hold it with your opposite hand to stretch your shoulder and upper back.
- Overhead Triceps Stretch – Reach one arm overhead, bend your elbow, and use the opposite hand to gently press the elbow for a triceps stretch.
- Seated Forward Fold – Sit with your legs extended, reach for your toes, and stretch your back and hamstrings.
- Butterfly Stretch – Sit with your feet together and knees out to the side. Gently press your knees toward the floor to stretch your inner thighs.
- Chest Stretch (Doorway Stretch) – Stand in a doorway, place your arms on the frame, and lean forward to stretch your chest and shoulders.
- Calf Stretch – Stand facing a wall, place one foot behind you, and press your heel toward the floor to stretch your calf.
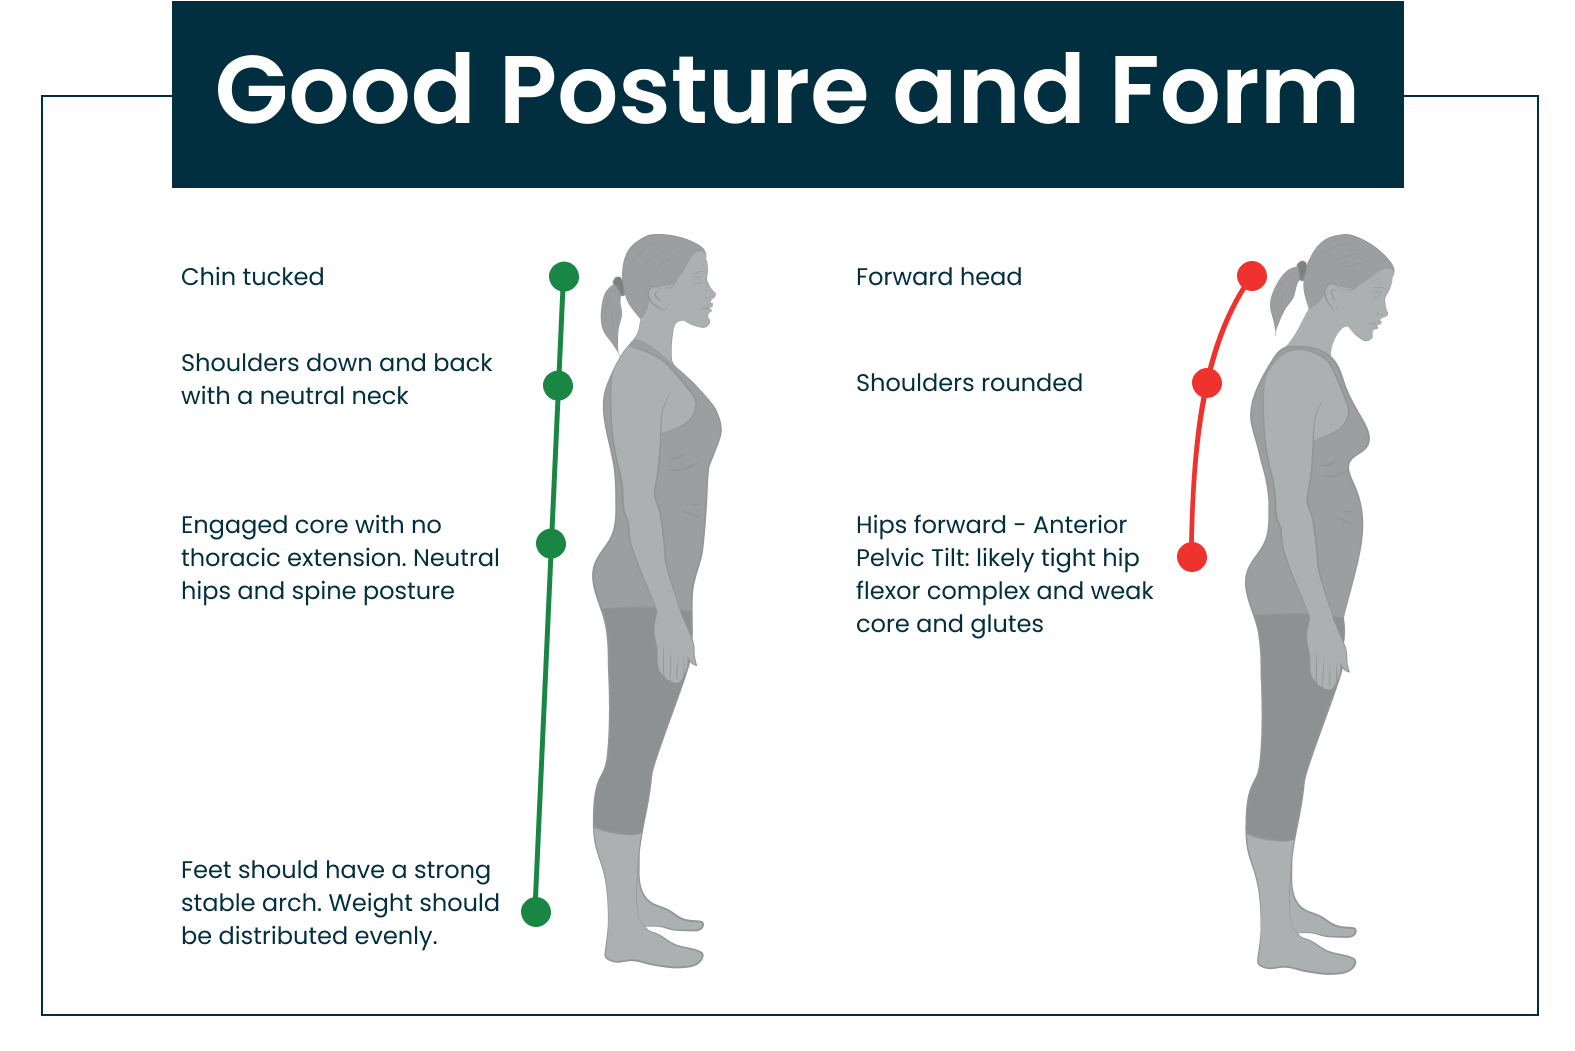
The Importance of Proper Form and Posture
Maintaining good posture and alignment during strength training is crucial to avoid unnecessary strain or injury. Proper form ensures you target the correct muscles, maximize efficiency, and minimize risks of setbacks that could hinder progress.
Key Aspects of Proper Form:
- Core Engagement: Keep your core activated to provide stability and support.
- Neutral Spine: Avoid arching or rounding your back to maintain alignment.
- Controlled Movements: Move deliberately to focus on technique rather than speed.
Good posture alleviates stress on your lower back, supports overall body alignment, and reduces the risk of joint pain, muscle strains, or imbalances that could lead to long-term issues. Prioritizing form ensures safer and more effective workouts, setting the foundation for sustainable progress.
Beginner Tips for Good Posture and Form
- Engage Your Core: Keep your abdominal muscles tight throughout each movement. A strong core stabilizes your body and supports your lower back.
- Neutral Spine: Maintain the natural curve of your spine, avoiding exaggerated postures like overarching or rounding your back. Keeping a neutral spine protects your lower back and ensures safe lifting.
- Controlled Movements: Avoid rushing through exercises. Slow, controlled movements allow you to focus on form and prevent swinging or jerking motions that can strain muscles or joints. A good rule of thumb for strength training is using a tempo of 3 seconds down, a 3-second hold and squeeze at the bottom, 3 seconds up, and a hold and squeeze at the top.
- Check Your Shoulders: Keep your shoulders relaxed and down, avoiding tension or hunching them toward your ears. This helps prevent neck and shoulder strain.
- Use a Mirror: Mirrors can be a valuable tool for beginners, allowing you to visually check your posture and alignment during exercises.
- Breathe Properly: Breathe steadily throughout your exercises. Avoid holding your breath, as this can elevate blood pressure, slow recovery, and increase fatigue during your workout.
Note: It’s better to lift lighter weights with good form than heavier weights with poor form. Prioritizing quality over quantity sets the foundation for long-term success in strength training. Proper form helps you target the right muscles effectively and reduces the risk of injury, which could delay your progress.
Getting Started with Strength Training
To start strength training, begin with lighter exercises or use your own body weight to build strength and confidence. Gradually increase the weight as your muscles adapt, ensuring you maintain good posture and reduce the risk of injury. Focus on exercises that target all major muscle groups and aim for 3 sets of 8-12 repetitions, performing 3-5 different exercises per session.
A repetition (or “rep”) refers to the number of times you complete an exercise in a row, while a set is a group of repetitions. For example, completing 8-12 repetitions equals one set. Rest sufficiently between sets to allow your heart rate to lower. It’s crucial to alternate muscle groups (e.g., upper body vs. lower body) across workout days to avoid overworking the same muscles. This rest period allows muscles to recover and grow while minimizing the risk of injury.
As you progress, gradually increase weight and intensity, but do so cautiously. Overloading too quickly can strain muscles and joints, potentially leading to injury. Starting with lower weights and increasing gradually helps your muscles strengthen safely over time. Remember, consistency and patience are key to building a solid foundation while protecting your body.
Exercises to Try
Banded Side Steps
This exercise uses resistance bands, which are versatile and affordable tools for improving flexibility, balance, and stability.
- Place the resistance band around your legs (above your knees or around your ankles for varying resistance).
- Start in a slight squat with knees bent and core engaged. Step sideways, keeping tension on the band.
- Step back to the starting position, maintaining control.
Targets: Glutes, quads, hips
To increase difficulty: Use a higher-resistance band, deepen your squat, add steps, or increase speed.
Bicep Curls
Strengthen arm muscles with dumbbells, water bottles, or canned goods.
- Stand with feet shoulder-width apart and shoulders back.
- Hold weights with palms upward, elbows close to your body.
- Curl the weights toward your shoulders, then lower them slowly.
Targets: Biceps
To increase difficulty: Use heavier weights, perform more repetitions, or slow your movements.
Rows
Strengthen your back, arms, and core with weights or household items.
- Stand with feet shoulder-width apart, knees slightly bent, and hinge forward at the hips.
- Hold weights with arms extended, palms facing your body.
- Pull weights toward your hips, squeezing your shoulder blades, then slowly lower them.
Targets: Back, shoulders, arms
To increase difficulty:Use heavier weights, slow the motion, or increase repetitions.
Triceps Extensions
Strengthen the muscles on the back of your upper arms.
- Hold a dumbbell or similar weight overhead with both hands.
- Bend your elbows to lower the weight behind your head, keeping your upper arms stationary.
- Extend your arms back to the starting position.
Targets: Triceps
To increase difficulty: Increase weight, repetitions, or slow the lowering phase.
Push-ups
Strengthen the upper body and core with this classic bodyweight exercise.
- Lie face down, place hands slightly wider than shoulder-width apart.
- Keep your body straight and lower yourself until your chest nearly touches the floor.
- Push back up to the starting position.
Targets: Chest, arms, core
To increase difficulty: Add repetitions, incline/decline variations, or weights.
Squats
A foundational movement for lower-body strength and mobility.
- Stand with feet slightly wider than hip-width apart.
- Push hips back as if sitting in a chair, lowering your body until knees are at a 90-degree angle.
- Push through your heels to return to standing.
Targets: Legs, glutes, core
To increase difficulty: Add weights, increase depth or repetitions, or slow the motion.
Lunges
Improve stability and strengthen legs and glutes.
- Stand with feet hip-width apart, then step one leg back, lowering both knees to 90 degrees.
- Push through the heel of the front foot to return to standing.
Targets: Quads, hamstrings, glutes
To increase difficulty: Hold dumbbells, slow the movement, or add repetitions.
By incorporating these exercises into your routine, you’ll build strength, improve balance, and support overall mobility.
Rest and Recovery
It is very important to listen to your body during exercise. If you feel pain or experience discomfort, adjust or stop the activity immediately. Be sure to rest for 30 seconds to 2 minutes between sets. After exercising, give your body adequate rest between sessions, especially when starting out. Aim for 1-2 days of rest between sessions and stay hydrated.
As you incorporate more movement and recovery into your routine, take note of how exercise makes you feel both physically and emotionally.
Sending Health Your Way!
The Tula Clinical Team
Austin MS, RDN, CSR, LDN, CD
Aubree RN, BSN
Spencer BS, CPT
Tula Takeaways |
|---|
| 1. Start Small: Beginning resistance or weight training doesn’t have to feel overwhelming. Start with one exercise at a time and gradually work your way up to incorporating multiple exercises for a complete workout. |
| 2. Ask Questions: Take advantage of all your LIVE TULA resources, as well as local community resources like the YMCA or JCC, and even instructional videos on YouTube. There are countless ways to learn how to integrate strength training into your daily routine. |
| 3. Listen to Your Body: While some muscle soreness is normal when starting weight training, ensure you are gradually increasing the intensity of your workouts to avoid excessive soreness that interferes with your daily activities. Remember, just like learning to crawl before you run, strength training has its own progression. If you’re new to it, think of yourself as being in the “crawling” stage—take it step by step. |


The LIVE TULA blog is informational and not medical advice. Always consult your doctor for health concerns. LIVE TULA doesn’t endorse specific tests, products, or procedures. Use the information at your own risk and check the last update date. Consult your healthcare provider for personalized advice.

